You’re welcome to contact the sculptor for more details and images at artist@chinacatsunflower.net
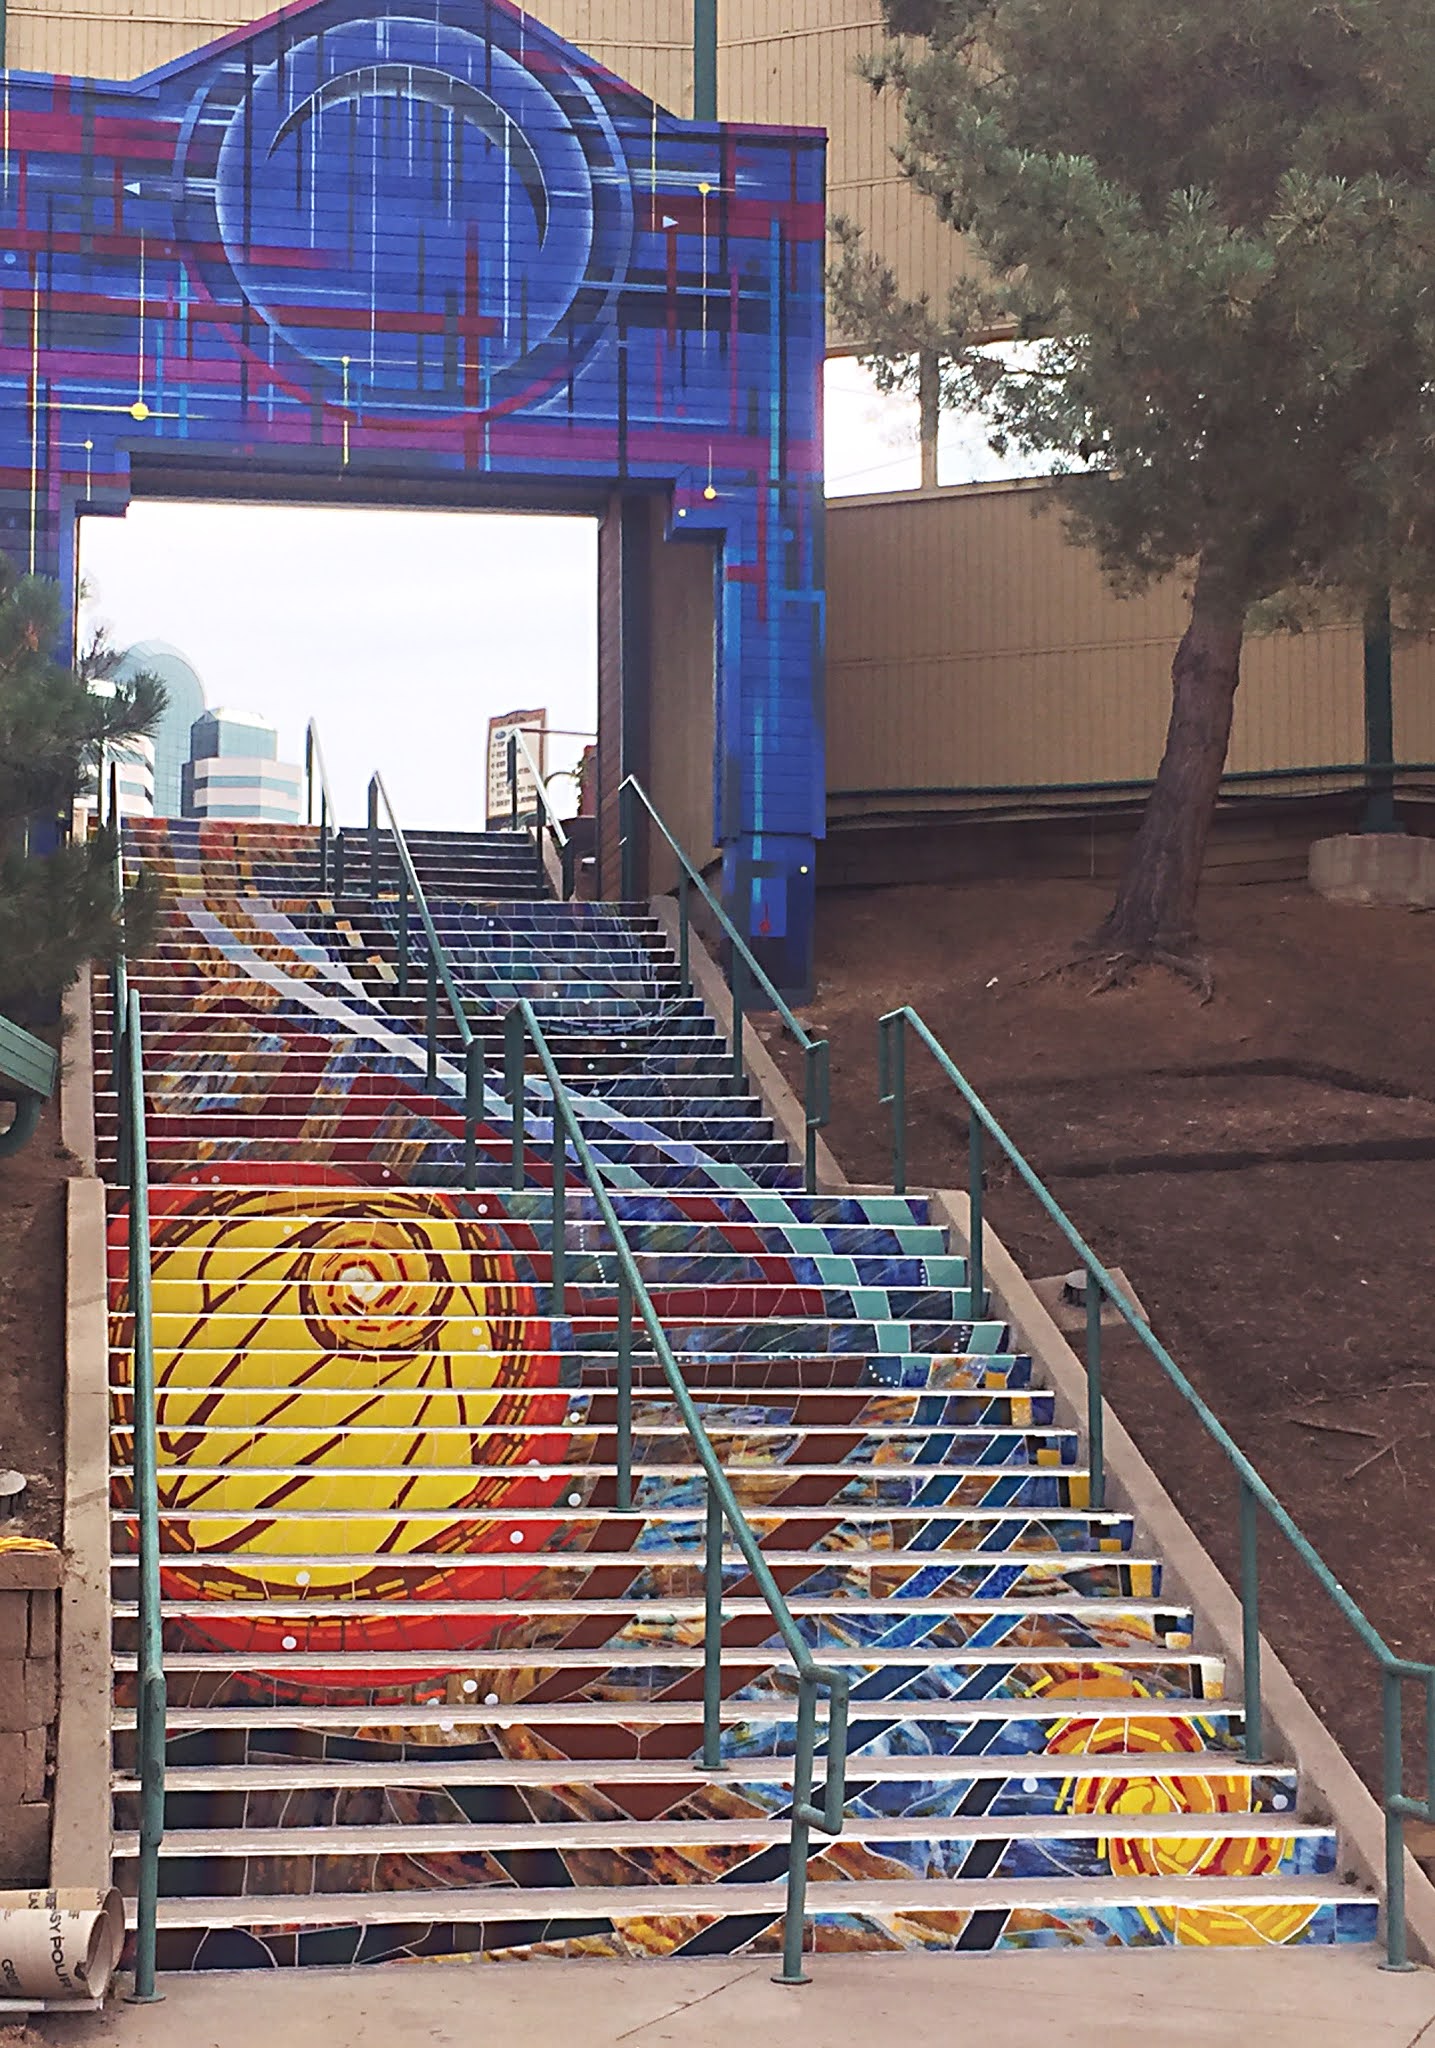
Images of the Final Installation


Progress 09/17/20
Here are images for stair risers #36-40. They are taken at night to show the reflective light.


This is installation covers 504 linear feet of tightly fitted fused glass tiles. It includes 95 sheets of colored glass uniquely manufactured by Bullseye and Spectrum. There’s a play with light and color using iridescent coatings and layers.
Progress 09/16/20
The project for the Museum of Outdoor Arts is nearly ready for installation at the Grand Entrance to Fiddler’s Green Amphitheater. There are 42 stair risers. This is #42 ready to mount for it’s backing.


Progress 08/20/20
Riser #32 is in the kiln. Only 10 left!


Progress 07/21/20
Riser #21 is heading into the kiln. Halfway marker has been reached.From Paper to Glass
Here is a documentation and restoration bread crumb trail.This is chronological documentation of the process.
The Calculations lead into the creation of full-sized templates. They were first made as large document prints, then trimmed into the individual risers.


Preparing the kiln shelves.

The template is adjustable as every step is a different size. Each riser needs to be sized to fit the variations.


Each sheet of glass needs to be cleaned.

The first glass pieces that are cut is the clear. It is fitted into the template and marked as a guide for the colored glass.

The colored glass is cut into the template. It gets a artistic layer of frit to follow the pattern on the template.


The individual tiles are loaded into the kiln.

After the fire, the risers are boxed. Each fire completes four risers at a time. Firing time is about 28 hours with another 5-6 hours to let the kiln cool to be able to unload the artwork.

The template is placed back into the form and marked for connecting colors and shapes of its adjacent risers.

Using the template each tile is ground to fit. When the glass is fired, it spreads like a pancake batter on a skillet. It need to be edged and shaped to a more crispy form.


Tiles fitted back into template and accurately matched to the marking from the template.

Tiles are re-boxed and placed in to order to transfer to mounting template.

The mounting template is a separate template in the outdoor studio. The paper template is placed upside down and is marked to accurately place tiles to meet the adjacent risers' colors and shapes.


This is the end of the template's life. It is rolled and marked. It will serve as a reference should any restoration activities occur 50 years from now.

The tile backing is cut from a large parent sheet. It is a nylon 1/2" hole net.

The tiles are placed upside down and accurately matched to the marking from the template.


Contact cement adhesive is brushed onto the back of the tile. A strip of the netting is pressed into the cement and weighted. The adhesive cures for about 36 hours. This frame holds two risers at a time.


Once cured, the entire riser is now one 12-foot-long piece. It is removed and flipped over to a 12-foot-board. The riser is cleaned and washed to remove any contact cement from it's surface.


The risers are marked for location and orientation. They are assembled together to check for accurate alignment. At this point, they are stored and waiting to be assembled on-site. The contact cement will continue to cure for the next 3 weeks.


Progress 06/15/20
Riser 9-12 will be unloaded out the kiln today. Risers 1-8 are now on tile backing and ready for installation. Will be starting to cut glass for Risers 13-16 for the next fire. I would expect the next fire will occur next week.


Progress 05/11/20
Four of the risers are finished. The sections are not lined-up in these images.


Progress 04/27/20
The first four risers are in the kiln. Should be able to pull them out tomorrow.


Prepared kiln shelves


Some of the sheets of glass required to complete the project were found at the supplier on-hand. An order for glass was placed and should be available in Denver sometime mid-May.


The First Riser
A paper template has been fitted into the glass template and the 12-foot-lengths are locked in with clamps.I begin by cutting the clear glass into the glass frame and tracing the design and cut marks on the clear glass.


Working each piece, the colored glass is cut to match the markings on the clear glass. Here are some images of the basic geometry forming. Once all forms have been cut, the glass will be embellished with frit and stringers. From there it will be directly loaded onto a kiln shelf. There will be a diagram made for every kiln shelf to identify each section of mosaic with the template.... but those images are still to come!
This is exciting to see the design take shape in glass.


Assembling the Glass Frame
Once in the studio, the frame is getting its parts assembled. The two 12-foot-lenghts are adjustable. Two more lengths are going to be used to build multiple risers at a time.The studio got rearranged to accommodate the long frame. Good thing everything is on wheels!

Building the Glass Frame
The treads are going to be assembled in full 12-foot wide sections. To do so, a plywood platform is built to hold two risers at a time and an area to cut glass.
"Stormy" approves of the work.

Determining the Backing Material
Each riser is 12-feet-wide. It is ideal to assemble the entire riser in the studio as one piece, then applied to the riser as one piece. By doing so, it will greatly decrease the time required to be on-site for the installation, and also keep the assembly of the mosaic quite tidy.I chose to use a heavy duty plastic mesh to provide rigidity and strength. The glass is adhered to the mesh by an industrial grade contact cement to ensure stability. When this mesh gets installed, it will bond to the thin-set mortar. It will increase the depth of the tile to 3/16".
This is a sample of the glass mounted to the mesh.

Beginning Template Creation
Most of this work was done on the computer, creating a full-size design that was printed in 12-foot lengths on an oversized printer. Due to the wifi and all the folks working at home, the transmittal became a challenge. So the templates were chopped to 6-feet in length and sent over the wee hours of night to gain the most transmission broadband.Here are 12 paper templates. Each stair riser was measured individually and the template was sized to fit the exact measurement of the concrete less a 0.25" to accommodate the stair nose molding.
This is an image of the first 36" of risers. There are 7 stairs on the print out. They have score marks and are numbered 1- 42.


Conceptual Design
The project is a fused glass installation that will be applied to the stair risers on the West Entrance of the Fiddler's Green Amphitheater.

Written Details and Design Considerations
Museum of Outdoor Arts
“Stairway to Heaven”
Fiddler’s Green Amphitheater
Greenwood Village, Colorado, 2019
Sculptor: Reven Marie Swanson
Design Considerations“Stairway to Heaven”
Fiddler’s Green Amphitheater
Greenwood Village, Colorado, 2019
Sculptor: Reven Marie Swanson
The origin of “Fiddler’s Green” plays an interesting reference in folklore and literature. I interpreted the legend as a transitory place for souls to meet, dance and celebrate. There’s a canteen to drink and be merry. It’s a collection of fellow comrades and a shared wholeness. I want to present these ideas in a modern, contemporary context. That lead my studies to images of cosmic microwave patterns, quantum physics and photoelectronic imageries. In our modern culture, we tend to see souls as energy mixed in a transitory state of the cosmic conscience.
The research for this project, I found examples of stairway art. The designs are generally elementary, such as trees, rivers, piano keys, faces – mostly objective and representational art. The materials are paint, vinyl and ceramic tile. The tiles used are square production or rough “smashed” tile patterns. It is proposed to use fused glass. It is one-of-a-kind and a unique application, which to my knowledge no other example exists in our modern art culture.
Fused glass will be fabricated into a “puzzle-piece” mosaic configuration. Each tile is cut to fit the adjacent tile. The media of fused glass lends itself to interact with light by use of iridescent, translucent and opaque qualities. The color variations are endless by blending frit (powdered glass). The overall image is non-objective and lends itself to personal interpretation.
The proposed design offers a large geometrical shape to be seen from a distance. Variations in texture will play with the ever-changing natural and artificial light creating a visual energy. As the viewer approaches and climbs the stairwell, a more intricate detail unfolds. The design will create a liquid and transitory feeling. It will be whimsical, dance, and celebrate the gathering of souls.
As a sculptor, I have created outdoor three-dimensional works that embraces kinetic energy. For my tile and two-dimensional works, I explore “implied kinetic” energy. For this project, there will a layered effect of color and material to allow a visual energy that embodies movement and a feel of liquid tension.
Material Specifications
The glass will be fabricated from the Bullseye Glass series, COE 90. The fusing process will be two doubled-rolled sheets to create a finished thickness of 0.375" The mosaic pieces will be assembled on fiberglass netting to create a flexible backing. There are 39 steps that are 12-feet-wide. The approximate height of each riser is 5". The total square-feet for the project is 195-square-feet.
Installation Considerations
Each riser will have a corresponding 12-foot-long mosaic piece supported by a fiberglass backing. The mason surface will be prepared with a hand-mixed mastic using an epoxy liquid additive. After applying the mosaic piece, colored non-sanded grout will be spread to fill between tiles. It too, will have an epoxy additive for exceptional strength.
A bead of clear sealant will be applied at the base of each riser to protect from water and snow melt ability to penetrate the transition point of mosaic and concrete stair.
The height of each riser will be built to underlay the aluminum stair tread by 0.25". An aluminum flat bar will be installed under the tread as a spacer for glass and tread.
Time for Installation
The time to install the entire project is approximately 3 days with anticipated installation date of mid-April (as soon as overnight temperatures are suitable for the materials to cure properly).
Maintenance and Durability
Glass is highly durable for our Colorado environment. The largest tile will not exceed 8" in length. Using smaller tiles, the fiberglass backing and reinforced mastic protects the tile from damage due to heavy foot traffic.
The nature of glass is that it will never fade or lose pigment over time. The material will not degrade over time due to exposure to light, temperatures or water. To clean the surface use mild soap and/or glass cleaner. A routine of once a year cleaning to remove pollution residue will brighten the mosaic like new. It may done so by hand or using a power washer.
No comments:
Post a Comment